Please excuse the home video. Our video guy (Jeff) decided to pull a fast one and get married. So he’s on some Hawaiian island right now nursing umbrella drinks and making me do this.
Note #2: If you do not want to use the form builder mentioned below, please do not re-open or save existing pages that you’ve created with the templates entitled “Basic Squeeze Page” and “Basic Squeeze Page (Aligned To The Right).”
Note #3: This feature is extremely new and we absolutely want your questions in the comments below.
Hey, this is Clay from LeadPages, and I want to show you something that we’re incredibly excited to announce, and that is that we’ve added the ability for you to include phone number fields, address fields, and any other number of fields in your forms in LeadPages. Now, we’re rolling this out slowly and it’s not available on all templates, but right now, this ability is available on two templates. It’s available on the basic squeeze page template and the basic squeeze page template aligned to the right, and let me show you how this works.
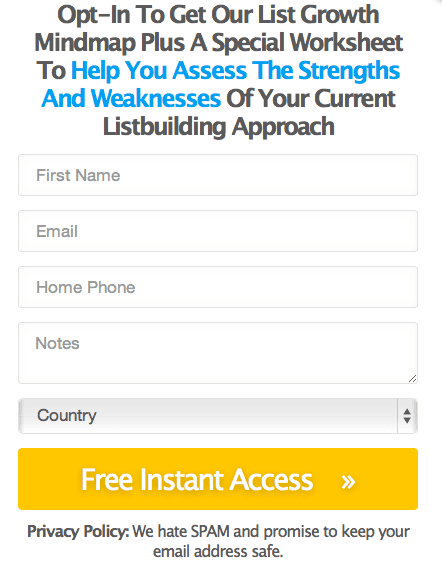
So I’m here in AWeber and I’ve created a form. It has a number of additional fields that I’ve added to it. I’ve added a phone number field. I’ve added a favorite color field. I could potentially add any other number of fields to this including address fields, SMS, you know, cell phone number fields. Anything else that I could conceivably add to this form is going to work here. So I’m going to click on ‘Save Your Form’ and again, you can create this in whatever CRM or email service provider you’re using. There will be a form builder and just create your form in that CRM or that email service provider like you normally would, and when you’re in LeadPages, just choose one of these two templates to get these additional form fields. I’m going to choose this one, and when I click on this button, the pop up appears. I can adjust this text as needed. I also can go here to integration settings and I can load the form that I just created in AWeber. So click on here and then I click here on customize this form, and what it’s going to do right now is load the form that I just created.
Now, the name and email fields are required, but here under form fields, it says phone number and favorite color so I’m going to go and load these fields as well. I can also change a number of things about this form; button, color, spacing, alignment, a whole bunch of other things. I can move these fields around as necessary and I can also edit the text that comes up when a required field isn’t entered and I can also change the values that appear when invalid data is submitted to the form. I’m going to click on okay here, and I’m going to click on ‘Save.’ I’ll call this blog ‘Demo’ and I’ve now created this page. So when I go and load the page and I click here for free instant access and I fill this out, favorite color, blue, and I’m going to click here on free instant access, then it goes through.
This feature is now available. It is something that’s new. We do want your suggestions on how you’re implementing it and we’d love to hear from you. Thanks so much. Take care.
[0:02:47] End of Audio


